Revisit: Wildcard SSL certificate from P12/PFX file into Domino

Posted by:

The objective of this article is to provide an example on how to  do this with hopefully no discussions and no questions unanswered. Of course this example is based on a particular situation with a special certificate provider but can hopefully be translated to any other situation with other certificate authorities.
Wrote an earlier article, this is an update

Contents
1. Assumptions
2. What do I need
3. OpenSSL
4. Kyrtool
5. Syntax
6. Example
7. Implement the files on the server
8. Check out if it works
9. Important note
10. Conclusion

Assumptions:
Running Windows 64 bits (directory separator = \)
PFX file contains both certificate, intermediate and root certificates 
Domino server running 9.0.1 FP3

What do I need:
1. An exported P12/PFX file from in my case IIS, containing the wildcard certificate private key as well as the certification path to it.

2. OpenSSL:
Homepage: https://www.openssl.org/source/
Easy precompiled: https://slproweb.com/products/Win32OpenSSL.html
The one I used: https://slproweb.com/download/Win64OpenSSL-1_0_2g.exe

3. Kyrtool:
Fixcentral short: https://ibm.co/1SAYX5E
Fixcentral long: https://www-933.ibm.com/support/fixcentral/swg/selectFixes?parent=ibm%7ELotus&product=ibm/Lotus/Lotus+Domino&release=9.0.1.2&platform=All&function=fixId&fixids=KYRTool_9x_ClientServer&includeSupersedes=0

Syntax:
<ossldir> = Where you installed OpenSSL eg. C:\OpenSSL-Win64
<pfxdir> = Where you have placed your pfxfile
<pfxfile> = Name of your pfxfile eg. wildcard_acme_com.pfx
<pfxpassword> = Password to your pfxfile
<pemdir> = Where you have placed your pfxfile
<pemfile> = Name of your pfxfile eg. wildcard_acme_com.pem
<notespgmdir> = Notes or Domino program directory, minimum 9.0.1 FP3
(assumes that notes program directory is in your path, if not execute from program directory)
<kyrdir> = Directory where you want to put your kyrfile
<kyrfile> = Name of your kyrfile eg. wildcard_acme_com.kyr
<kyrpassword> = Password to your kyrfile

Check your pfx file:
<ossldir>\bin\openssl pkcs12 -info -in <pfxdir>\<pfxfile>
use <pfxpassword> when asked (nothing on PEM)

In general:
1. <ossldir>\bin\openssl pkcs12 -in <pfxdir>\<pfxfile> -out <pemdir>\<pemfile> -nodes -chain
use <pfxpassword> when asked (nothing on PEM)
2. <notespgmdir>\kyrtool create -k <kyrdir>\<kyrfile> -p <kyrpassword>
3. <notespgmdir>\kyrtool import all -k <kyrdir>\<kyrfile> -i <pemdir>\<pemfile>
Check in general:
1. <notespgmdir>\kyrtool show certs -k <kyrdir>\<kyrfile> >kyrcerts.txt
2. <notespgmdir>\kyrtool show keys -k <kyrdir>\<kyrfile> >kyrkeys.txt
3. <notespgmdir>\kyrtool show roots -k <kyrdir>\<kyrfile> >kyrroots.txt

Example:
1. C:\OpenSSL-Win64\bin\openssl pkcs12 -in C:\mypfxfiles\wildcard_acme_com.pfx -out C:\mypemfiles\wildcard_acme_com.pem -nodes -chain
use <pfxpassword> when asked
2. C:\IBM\Lotus\Domino\kyrtool create -k C:\mykyrfiles\wildcard_acme_com.kyr -p password
3. C:\IBM\Lotus\Domino\kyrtool import all -k C:\mykyrfiles\wildcard_acme_com.kyr -i C:\mypemfiles\wildcard_acme_com.pem
Check sample:

1. C:\IBM\Lotus\Domino\kyrtool show certs -k C:\mykyrfiles\wildcard_acme_com.kyr >wildcard_acme_com_kyrcerts.txt
2. C:\IBM\Lotus\Domino\kyrtool show keys -k C:\mykyrfiles\wildcard_acme_com.kyr >wildcard_acme_com_kyrkeys.txt
3. C:\IBM\Lotus\Domino\kyrtool show roots -k C:\mykyrfiles\wildcard_acme_com.kyr >wildcard_acme_com_kyrroots.txt

Implement the files on the server
1. Copy kyr file and the associated sth file to the server
2. Add the kyrfile name to your internet sites document or server document depending how your server is configured
3. Modify the cipher part
4. Make sure the SSL port is enabled in the Internet Ports.. section
5. Restart your http task on the server, use sh ta onl and check that http listens to both 80 and 443

Check out if it works
1. Use your browser and connect to your server via https
2. Look at your certificate information
3. Congratulations

Important note:
Following this means that especially the pem file is unprotected, therefore make sure that keep it in a safe place during this and maybe deleting it afterwards. Same goes for kyrfile (you can not delete them but keep them as safe as you can) as they contain private key.

Conclusion
Doing this task is not more complicated than any other task that involves certificates using any other platform.

Link to this document: https://stage.infoware.com/?p=7226


2

Welcome to Infoware: Mikael Grenfeldt

Posted by:

Today we are pleased to welcome a new employee – Mikael Grenfeldt.

Mikael is highly skilled within IBM's collaboration solutions such as IBM Domino, IBM Notes, IBM Chat, IBM Traveler and he is a well sought after contribution to our seniour team.

On his first day (today) we treated him with extra special goodies to his morning coffee, so we hope this will ensure a good work relationship!


1

IBM Connections using Active Directory and Nested Groups

Posted by:

Case:
Customer wants to use nested groups in Access control for Communities, also it should be reflected in I'm a Member when user is looking for their communitys and so on. Connections was 4.5CRx

Google search Links that where tried, but did not work for me (for some reason unknown).
https://www.lbenitez.com/2015/11/how-to-enable-nested-ldap-groups-in-ibm.html
https://www-01.ibm.com/support/docview.wss?uid=swg21321308
https://www-10.lotus.com/ldd/lcforum.nsf/869c7412fe5d56b7852569fa007826e3/4aa9a40d4818785f85257b3b004e3240?OpenDocument
https://www.communardo.de/home/techblog/2014/06/04/nested-groups-ibm-connections/

Found something that worked for me (seems logical looking at the description).
https://social.technet.microsoft.com/wiki/contents/articles/5392.active-directory-ldap-syntax-filters.aspx
coming from thread
https://social.technet.microsoft.com/Forums/scriptcenter/en-US/f238d2b0-a1d7-48e8-8a60-542e7ccfa2e8/recursive-retrieval-of-all-ad-group-memberships-of-a-user?forum=ITCG

Description:
All groups specified user belongs to, including due to group nesting (Notes 10, 19)
eg. (member:1.2.840.113556.1.4.1941:=cn=Jim Smith,ou=West,dc=Domain,dc=com)
All members of specified group, including  due to group nesting (Note 10)
eg. (memberOf:1.2.840.113556.1.4.1941:=  cn=Test,ou=East,dc=Domain,dc=com) 
Note 10.
The string 1.2.840.113556.1.4.1941 specifies LDAP_MATCHING_RULE_IN_CHAIN. This applies only to DN attributes. This is an extended match operator that walks the chain of ancestry in objects all the way to the root until it finds a match. This reveals group nesting. It is available only on domain controllers with Windows Server 2003 SP2 or Windows Server 2008 (or above).

NOTE: 
All of this is of course done in the context of Deployment Manager.
After doing the changes a full resynch needs to be done with all nodes in the cluster (sometimes also take down node and use synchNode from the node) and restart the node.

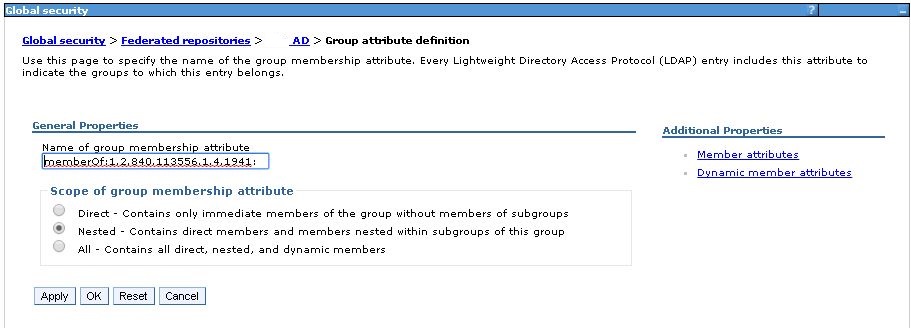
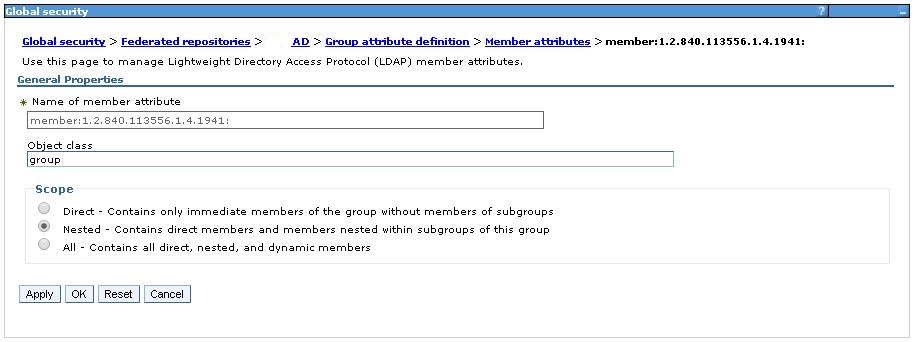
Solution is to change my setting in Websphere to reflect this:
nestgroup1
nestgroup2
nestgroup3

Also changed for performance reasons the following (optional):
Reason:
https://www.ibm.com/support/knowledgecenter/SSAW57_8.0.0/com.ibm.websphere.wim.doc/disablingnestedgroupsearches.html
Solution is to change according to instructions

How does it look in the files before and after the change, here are snippets of this:

wimconfig.xml before the change:
      <config:groupConfiguration>
        <config:memberAttributes name="member" objectClass="group" scope="nested"/>
        <config:membershipAttribute name="memberof" scope="nested"/>
      </config:groupConfiguration>

wimconfig.xml after the change:
      <config:groupConfiguration>
        <config:memberAttributes name="member:1.2.840.113556.1.4.1941:" objectClass="group" scope="nested"/>
        <config:membershipAttribute name="memberOf:1.2.840.113556.1.4.1941:" scope="nested"/>
      </config:groupConfiguration>

security.xml before the change (you can not cut and paste any of these because some parameters are unique to your environment):
  <userRegistries xmi:type="security:WIMUserRegistry" xmi:id="WIMUserRegistry_1" serverId="" serverPassword="{xor}" realm="defaultWIMFileBasedRealm" ignoreCase="true" useRegistryServerId="false" primaryAdminId="wasadmin" registryClassName="com.ibm.ws.wim.registry.WIMUserRegistry"/>

security.xml after the change (you can not cut and paste any of these because some parameters are unique to your environment):
  <userRegistries xmi:type="security:WIMUserRegistry" xmi:id="WIMUserRegistry_1" serverId="" serverPassword="{xor}" realm="defaultWIMFileBasedRealm" ignoreCase="true" useRegistryServerId="false" primaryAdminId="wasadmin" registryClassName="com.ibm.ws.wim.registry.WIMUserRegistry">
    <properties xmi:id="VMMURProperty_1" name="com.ibm.ws.wim.registry.grouplevel" value="1"/>
  </userRegistries>


Shortcut to this document: https:// https://https://stage.infoware.com/?p=7180
Thats all folks

0